Cloud IoT Provisioning with Azure
The Azure IoT platform provides a valuable suite of services to collect, store, and distribute IoT data and actions. Its IoT Hub service is the portal for registration and messaging with Internet-connected things. We want to make it easy for balena devices to register and interact with IoT Hub.
Our IoT provisioning tools automate device registration to Azure IoT Hub, and leverage balenaCloud and environment variables to store and access the registration credentials. This guide shows you how provisioning works and gets you started with the tools in the azure-iot-provision repository.
How It Works

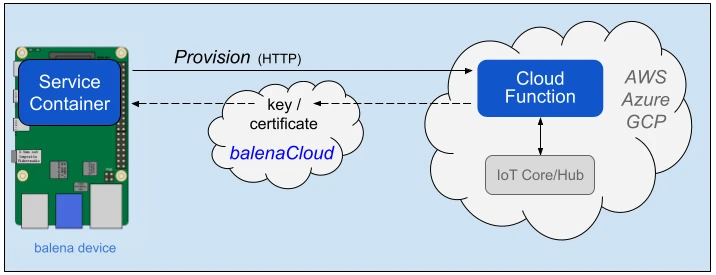
Provisioning includes three components:
- Service Container like Cloud Relay block on a device to request the provisioning and use the credential environment variables from balenaCloud
- Azure (cloud) function to securely validate device identity and register the device with IoT Hub, triggered by an HTTP request (source code)
- balenaCloud to accept and store the generated key/certificate credentials for the device
The cloud function first validates the device UUID in the provision request with balenaCloud. Then it generates a public key certificate and registers with the IoT Hub service. The function then provides the generated credentials to balenaCloud, which stores and pushes them to the device as environment variables for use by the service container.
In addition to registration, Cloud Relay block makes it easy to send data to Azure. It integrates with balena's block ecosystem for application development and messaging. So you only need to send your data to an MQTT container on the device, and the block handles all of the interaction with IoT Hub.
Note: A service container like Cloud Relay on the device is not required to send the provisioning request. You may call the cloud function HTTP endpoint from your compute infrastructure to pre-generate the key/certificate for the cloud. However, the device must be registered already with balenaCloud.
Getting Started
The tools described here automate per-device integration with Azure. However, first you must complete some initial one-time configuration on your Azure account. See the Azure setup section of the provisioning repo documentation for details.
Create, Deploy, and Test Azure function
The provisioning tools set up the Azure function itself as well as a provision HTTP endpoint to request provisioning based on a device's UUID. The workspace setup section of the documentation walks you through creation of this Azure function and HTTP endpoint, including:
- configuration of the tools for testing and deployment
- testing the function locally
- deployment to Azure and end-to-end testing
The result is a functioning HTTP endpoint on Azure, ready for provisioning requests.
Try a Tutorial
We created a blog post tutorial on device provisioning with AWS IoT and use of Cloud Relay block to send system metrics data. The tutorial also shows how to route data sent to IoT Core on to Cloudwatch for graphing.