Deploy to your Fleet
On balenaCloud, when we deploy code to devices grouped in a fleet, they all run what we refer to as a "release". A release consists of a Docker image or set of images on our registry. These images are built from a source code repository, either locally or remotely on the balenaCloud build server. When a successful release is created, all devices in the fleet are instructed to download and run the new release (according to the chosen update strategy).
There are 3 ways to create and deploy a release, namely balena push, balena deploy and git push. Each method has slightly different use cases and differ on how and where the container images are built. We'll explain each of the options in more detail below. If you are just starting out with balenaCloud, we recommend using balena push.
To get started with the balena CLI, check out our balena CLI masterclass
Balena Push
Overview
balena push is the recommended method for deployment and development on the balenaCloud platform. To use balena push you need to first install the balena CLI and ensure you are logged in to your account with balena login.
When you run the balena push <APP_NAME or DEVICE_IP> command from your laptop it will essentially take your project (or repository) folder, compress it and send it to the balenaCloud build server or local balenaOS device in localMode where it will be built.
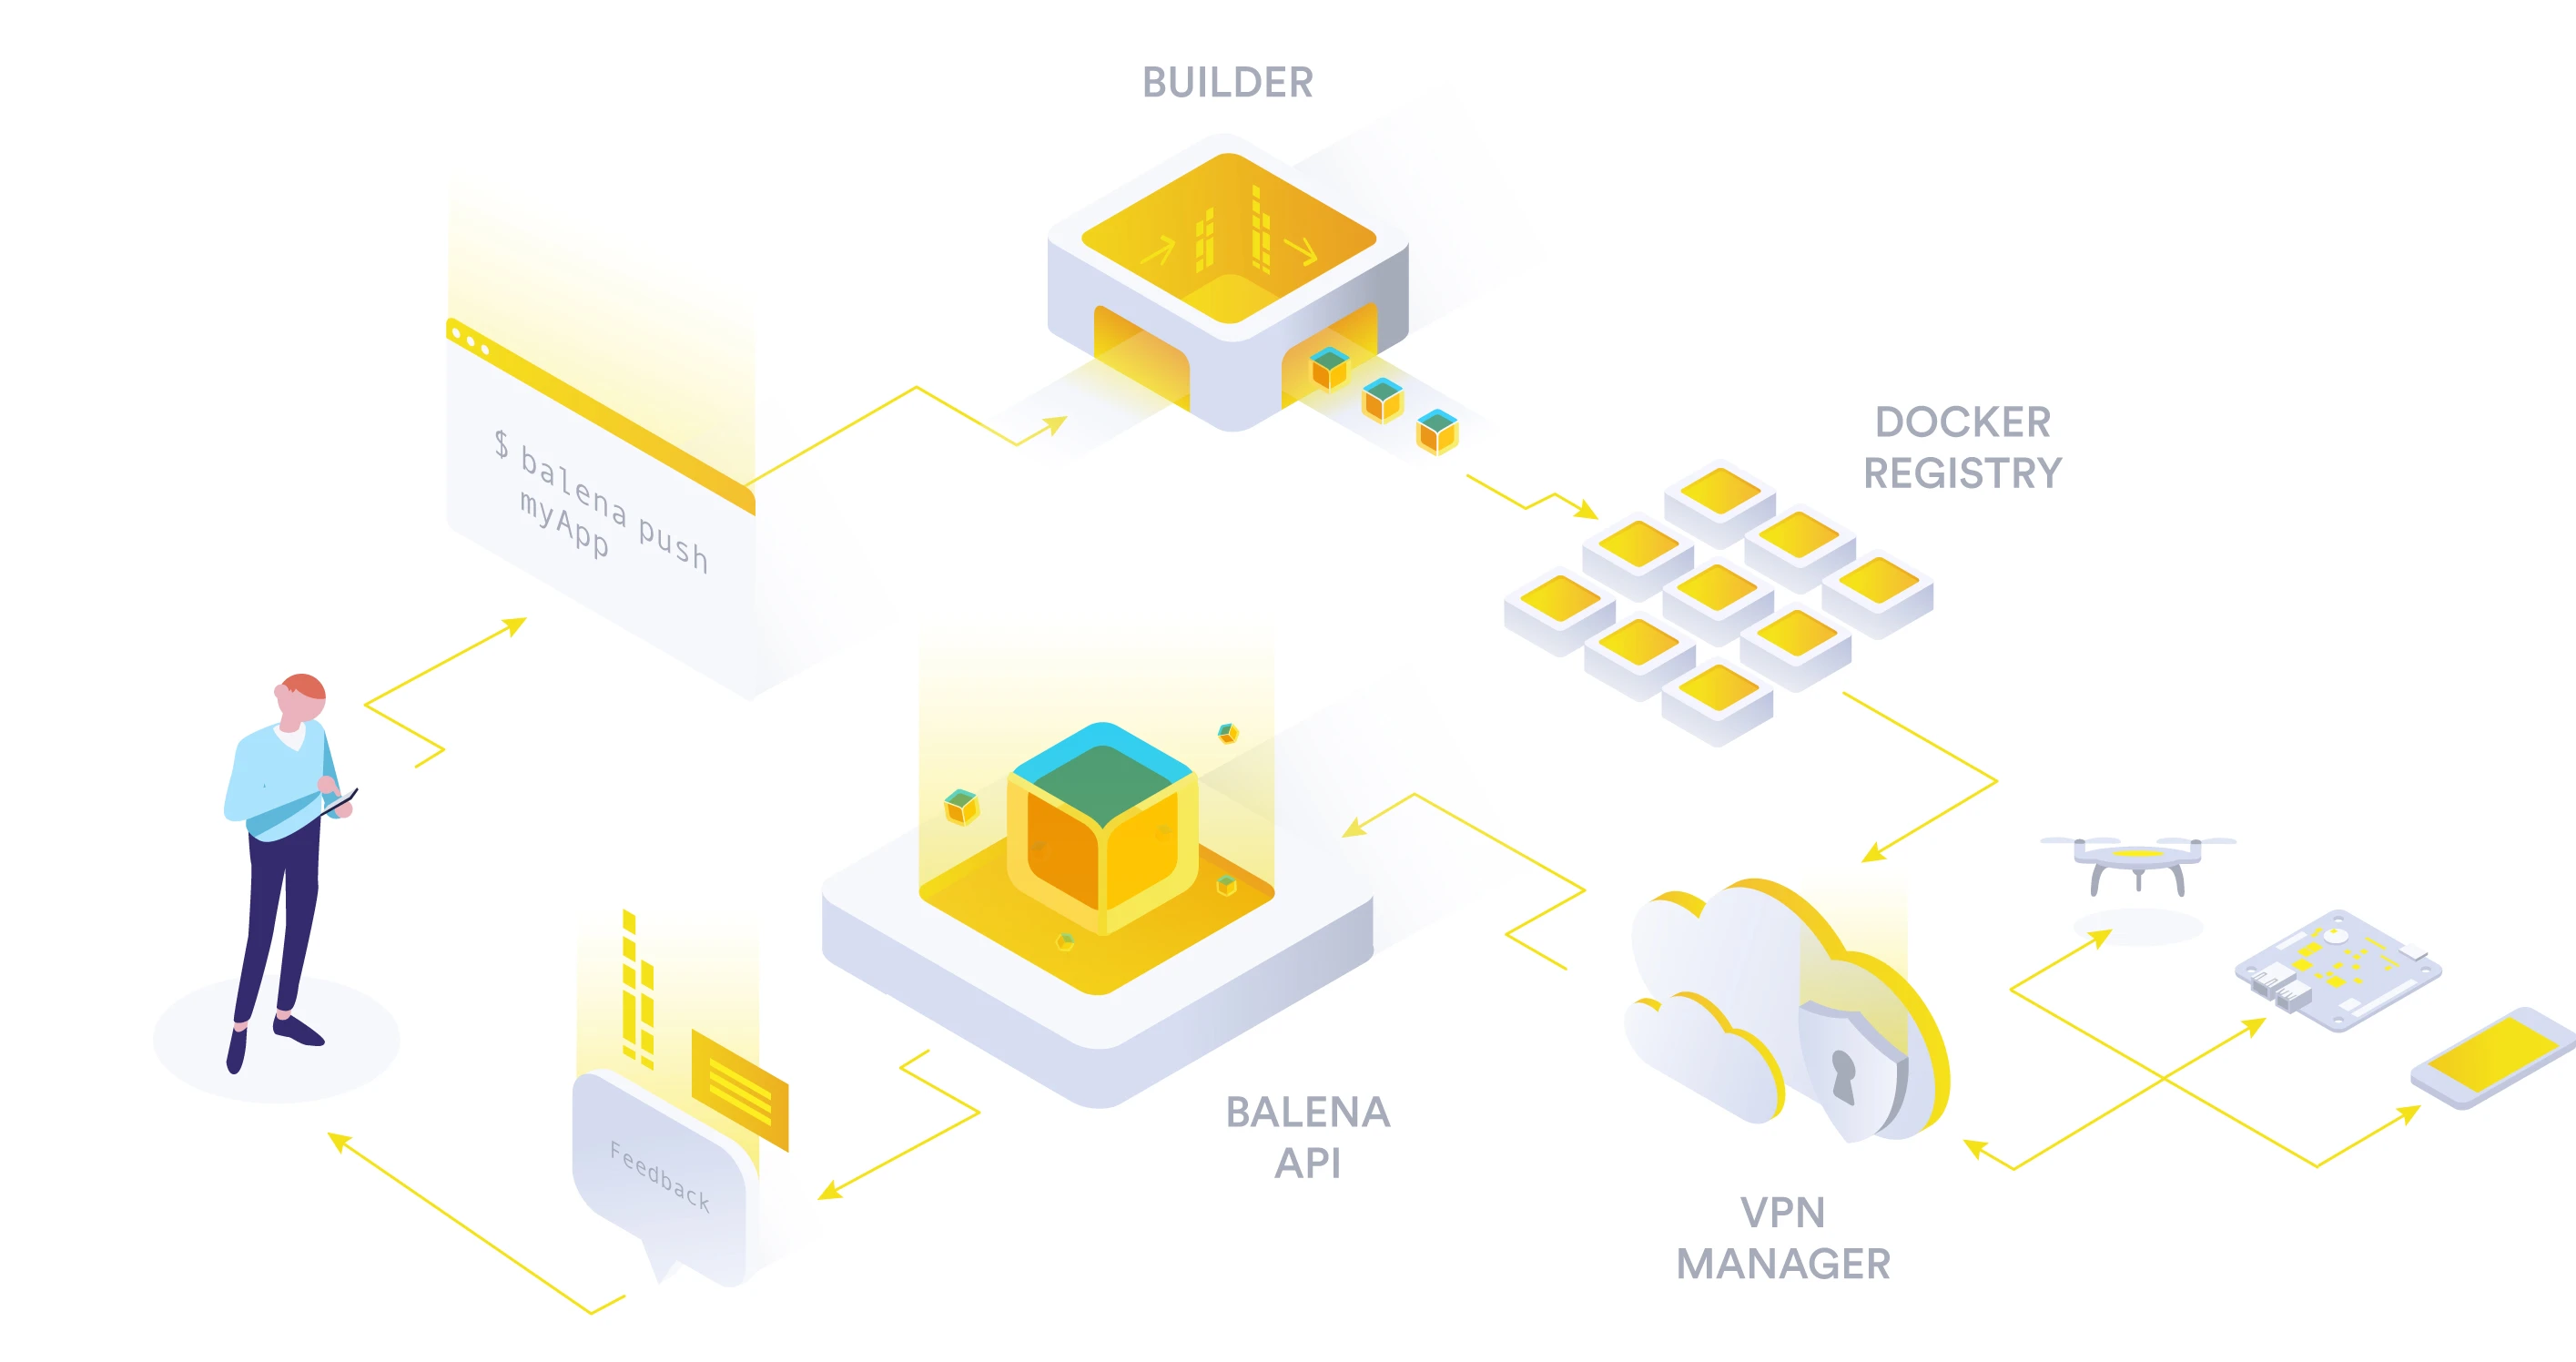
Once the cloud builder has successfully completed building all the images in the deployment, it will upload these images to the balenaCloud registry and create a release entry in the balena API database. It will then notify all the devices in the fleet that a new release is available. If you need to pull in proprietary code or use a private base image during your builds, you can do so using the build time secrets or private base images feature of balena push.
It should be noted that balena push is independent of git, so you are free to use any version control system you wish. This also means that it is possible to use git submodules in your project when deploying with balena push.
Note: Refer to the balena push command reference for additional documentation.
Balena Build & Deploy
Overview
The balena deploy is functionally very similar to balena push but avoids pushing any source code to the balenaCloud build server. It gives more control over how and where your container images are built, allowing for balena deploy to be integrated into your own CI/CD build system.
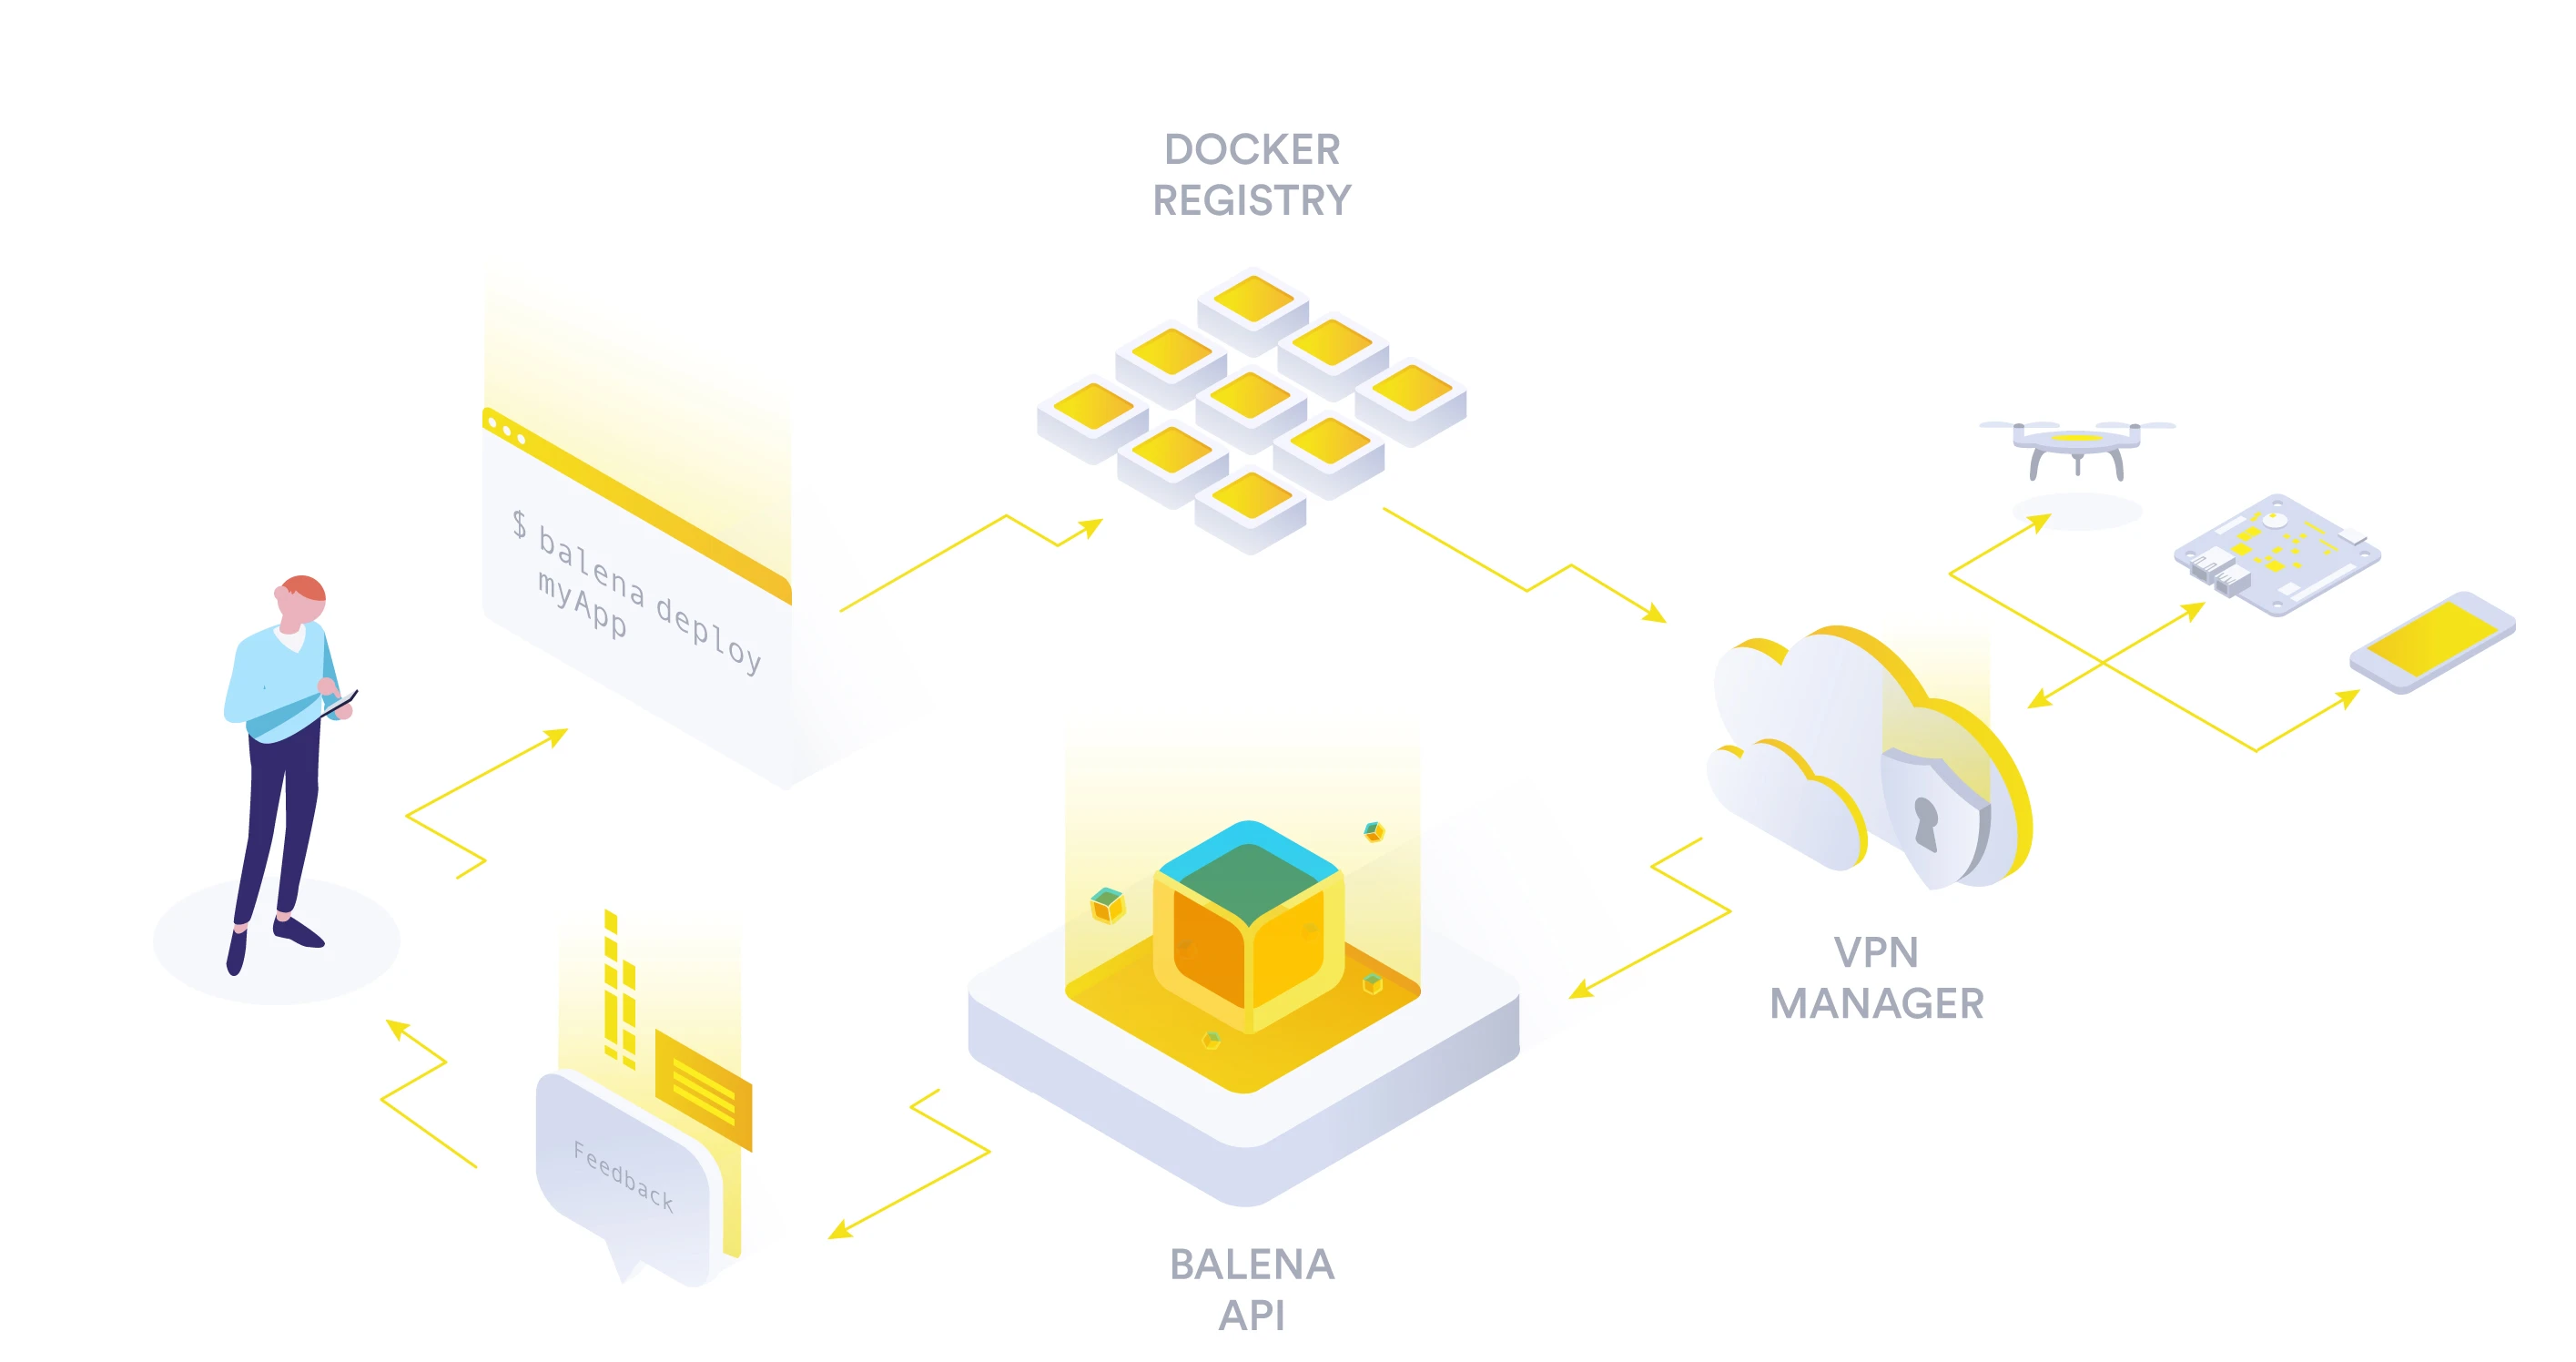
With balena build container images are built on your development machine or on a remote machine, by specifying a docker daemon's IP address and port number with the relevant command-line options (for example a device running a balenaOS development image). Depending on your fleet's targeted CPU architecture builds will be run emulated via qemu.
If you are building your own container images, balena deploy will upload the images to the balenaCloud image registry and then create a release entry in the balena API database. The devices in the fleet will then be notified of a new release and download it. Should balena deploy not find the required images on the specified docker daemon, it will automatically trigger a build.
Like balena push it is also independent of git, and you can use any version control system you wish. It is also possible to use private base images.
Note: Refer to the [balena build][cli-build-reference] and [balena deploy command reference][cli-deploy-reference] for additional documentation.
Git Push
Overview
The git push balena master method of deployment is the original deployment mechanism for balenaCloud. While we continue to support git push, it is considered a legacy method for pushing code to a fleet, and if possible you should use balena push as it makes for a consistent workflow and methodology.
The git push workflow requires that you have git installed on your development machine and that you have an SSH key setup on your balenaCloud account.
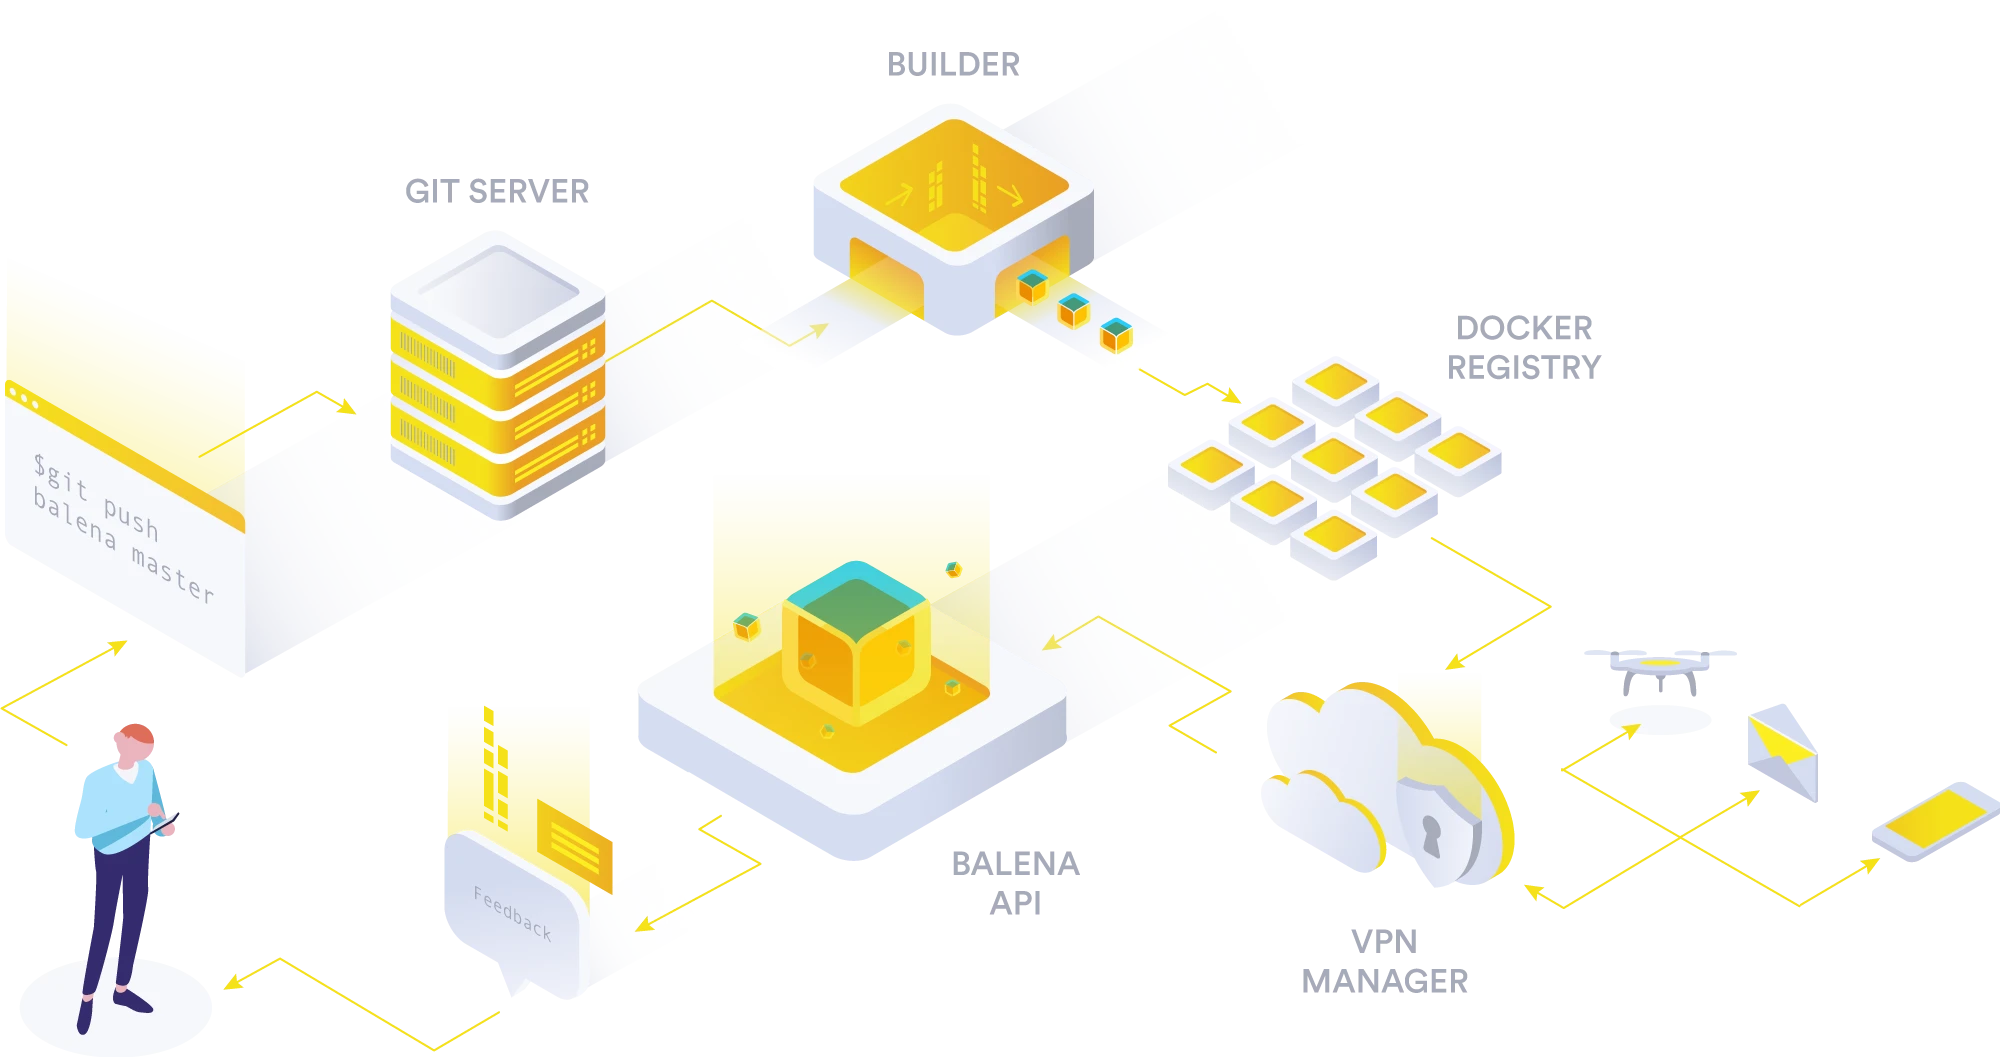
Then, simply add your balenaCloud app's git endpoint to your local git repository via git remote add balena <fleet git endpoint> . You can find the fleet git remote endpoint by clicking the 'Add release' button in the releases tab of the dashboard.
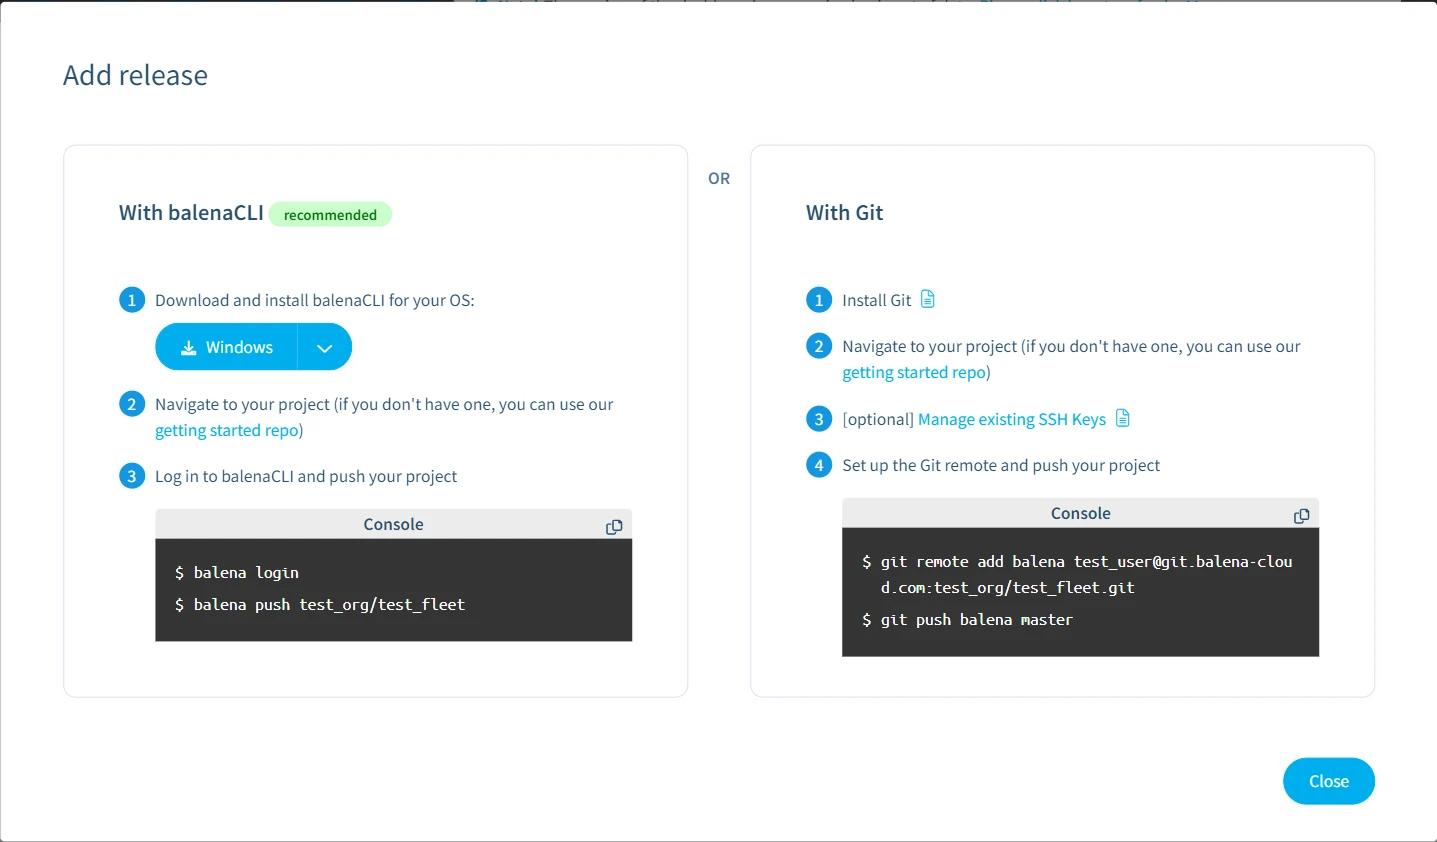
Whenever you subsequently need to push code to your devices, simply run
git push balena master.
Warning: The balenaCloud git repository is not intended as a code hosting solution, and we cannot guarantee the persistence of data in balenaCloud git remotes. We recommend you use a service like GitHub to manage and share your code.
If you want to push a different local git branch to your balena fleet all you need to do is:
git push balena my-local-branch:master
Switching Between Apps
To completely change the code you have pushed to a fleet with git you will need to force a rewrite of the git remote endpoint's history. To do this, you just need to run the same command with the -f flag from the new project you wish to deploy. For example:
$ cd project/my-new-project
$ git push balena master -f
Limitations
The git push workflow is a great way to deploy code, but it has a number of limitations when compared to balena push and balena deploy. One is mentioned above, where it is necessary to rewrite the history and force push to completely change the source code and build a new release from scratch.
Another is that it's not possible to use the build time secrets or private base images without having to commit your secrets into your code repository.
In order to allow options like emulation and nocache, the git push workflow uses specifically named remote branches (see next section) however, this has the limitation that it is not possible to invalidate the cache of an emulated build pushed with git push.
Additional Options
Like balena push the git push workflow also allows triggering a build that invalidates the Docker layer cache and builds from scratch. This can be achieved by pushing to a special branch called balena-nocache as shown in the example below:
$ git push balena master:balena-nocacheSimilarly you can also trigger a qemu build on the balenaCloud build server by pushing to the balena-emulated remote branch as shown below:
$ git push balena master:balena-emulatedProject Structure
When deploying a balena project, the build system will try to build the most appropriate release for a specific set of devices. The following section will discuss some of the mechanisms you can use to control the type of builds that are produced.
Project Resolutions
All the deployment methods will always try to determine the project type based on the following project resolution ordering:
- docker-compose.yml
- Dockerfile.<device-type>
- Dockerfile.<arch>
- Dockerfile.template
- Dockerfile
- package.json
This resolution mechanism looks at the files in the root of the directory you are deploying. If it finds a docker-compose.yml file, it will ignore all the other types and build a multicontainer release based on the service specification in the docker-compose.yml file.
If docker-compose.yml is not specified, the resolution system will assume a single container deployment and will build based on a Dockerfile.* file. These Dockerfiles can have extensions of .<device-type>, .<arch> or .template, and the build system will use the most appropriate file based on the targeted device or fleet. This is best described with an example:
In our example at the root of our project repo we have the following Dockerfile.* files:
project: $ tree -a
.
├── Dockerfile.raspberrypi3
├── Dockerfile.i386
└── Dockerfile
When we push this project to a fleet that has its default device type set to Raspberry Pi 3, the build system will use the device type specific Dockerfile.raspberrypi3 file to build from. If we instead pushed this to an Intel NUC fleet, the build would use the Dockerfile.amd64 file. When pushing to any other device type, the regular Dockerfile would be used to perform the build. This type of project selection will also work in service folders of multicontainer deployments; you can see an example of that in our Getting started with multicontainer project.
The file extensions are equivalent to BALENA_MACHINE_NAME for .<device-type> and BALENA_ARCH for .<arch> from the template files discussed in the next section. To find the correct name have a look at our machine names and architectures list.
Template Files
Often it's desirable to create a single Dockerfile that can be used and built for multiple different device types and CPU architectures. In this case, a Dockerfile.template file can be used. This dockerfile template will replace the template variables before the build is started. Currently the builder supports the following build variables:
| Variable Name | Description |
|---|---|
| BALENA_APP_NAME | The name of the fleet. |
| BALENA_ARCH | The instruction set architecture for the base images associated with this device. |
| BALENA_MACHINE_NAME | The name of the yocto machine this board is base on. It is the name that you will see in most of the balena [Docker base images][base-images]. This name helps us identify a specific BSP. |
| BALENA_RELEASE_HASH | The hash corresponding to the release. |
| BALENA_SERVICE_NAME | The name of the service defined in the docker-compose.yml file. |
You can find the values of %%BALENA_ARCH%% and %%BALENA_MACHINE_NAME%% for a specific device type here.
Private Base Images
In many cases, you will want to deploy container images from a private Docker Hub account or a personally hosted registry. In order to do this, you need to enable balena to authenticate with the private registry during the build, which is done by passing the --registry-secrets option with a path to the authentication secrets. An example is shown below:
For balena push:
$ balena push myFleet --registry-secrets ../registry-secrets.ymlOr for balena deploy:
$ balena deploy myFleet --registry-secrets ../registry-secrets.ymland the registry-secrets.yml file is outside of the code repository and has the following format:
'':  # Use the empty string to refer to the Docker Hub
    username: balena
    password: secretpassword
'my-registry-server.com:25000':
    username: myregistryuser
    password: secretpassword
'eu.gcr.io':  # Google Container Registry
    username: '_json_key'
    password: '{escaped contents of the GCR keyfile.json file}'
'ghcr.io':  # GitHub Container Registry
    username: GITHUB_USERNAME
    password: PERSONAL_ACCESS_TOKEN
It should be noted that in this case, the devices will still pull the container images from the balenaCloud registry. The authentication just allows the build step access to pull your private image at build time.
Build Time Secrets and Variables
Often it is necessary to use passwords or secrets during your build to fetch proprietary files or code but not have these sensitive files be downloaded to all the devices. For this reason balena push and balena deploy allow defining a .balena folder to hold secret files and variables that will get exposed to the image build but not propagate down to devices.
Build Time only Secret File
To use build secrets, make a subdirectory .balena in the root of your repository. Inside that directory, make another
directory named secrets and a file named balena.yml. Without any secrets, your tree should look like:
.
├── docker-compose.yml
├── .balena
│   ├── balena.yml
│   └── secrets
├── service1
│   └── Dockerfile.template
└── service2
    └── Dockerfile.template
To add a secret file, first add the file to the .balena/secrets directory:
.
├── docker-compose.yml
├── .balena
│   ├── balena.yml
│   └── secrets
│       └── super-secret-recipe
├── service1
│   └── Dockerfile.template
└── service2
    └── Dockerfile.template
Now, in the .balena/balena.yml file, add the following:
build-secrets:
    global:
        - source: super-secret-recipe
          dest: my-recipe
This will mount the super-secret-recipe file into /run/secrets/my-recipe file in every build container. However, the /run/secrets folder will not be added to the build context that is sent to the Docker daemon (or balenaEngine),
and therefore:
- The
/run/secrets/folder will not be present in the image that is deployed to the devices. - The
COPYorADDDockerfile directives will not be able to copy files from that folder. - The folder will be available "for the duration of
RUNdirectives", such that secrets can be accessed by scripts/code at image build time, for example:
RUN cat /run/secrets/my-recipe | secret_processing_script.shTo add a secret file to a specific service's build:
.
├── docker-compose.yml
├── .balena
│   ├── balena.yml
│   └── secrets
│       ├── super-secret-recipe
│       └── super-secret-recipe-2
├── service1
│   └── Dockerfile.template
└── service2
    └── Dockerfile.template

4 directories, 6 files
and balena.yml:
build-secrets:
    global:
        - source: super-secret-recipe
          dest: my-recipe
    services:
        service1:
            - source: super-secret-recipe-2
               dest: my-recipe2
This will mount the super-secret-recipe file as /run/secrets/my-recipe for all services, and super-secret-recipe-2 as /run/secrets/my-recipe2 for service1 only. Again, note that the /run/secrets folder is only available during the image build, and not present in the image that is deployed to the devices.
Subdirectories are supported in both the source (.balena/secrets) and the destination (/run/secrets).
Note: Currently balena build and balena deploy do not support build time secret files out of the box and need to be pointed to a balenaEngine instance. Refer to the balena build and balena deploy command references for additional documentation.
Build variables
It is also possible to define build variables that will be added to your build from the balena.yml file:
build-variables:
    global:
        - MY_VAR_1=This is a variable
        - MY_VAR_2=Also a variable
    services:
        service1:
            - SERVICE1_VAR=This is a service specific variable
These variables can then be accessed in your Dockerfile through the ARG instruction. For example:
FROM balenalib/armv7hf-debian

ARG MY_VAR_1

RUN echo "The build variable is ${MY_VAR_1}"
Build variables should NOT be used to hold secrets like access tokens or passwords if the Docker image is accessible to untrusted parties, because the Dockerfile ARG instruction may be stored in the image as the Docker documentation advises:
Warning: It is not recommended to use build-time variables for passing secrets like github keys, user credentials etc. Build-time variable values are visible to any user of the image with the docker history command.
However, secrets like tokens and passwords can be used in instructions like RUN through the mounted secret files, for example:
RUN /bin/cat /run/secrets/my-recipe | command_that_reads_secrets_from_stdinFiles under the .balena folders are not saved in the final image, hence being more secure than ARG.
If you are interested in seeing an example of build time secrets and variables see this project. Note this is just a toy project and in a real world setting it is not advisable to commit your
.balena secrets folder into the git repository. You should always add it to your .gitignore file.
The balenaCloud build server
The build server is a powerful tool that compiles code specifically for your device's architecture. With our build servers, compiling a complex dependency tree can be done in seconds, as compared to the minutes or even hours it may take to build on your device.
All code that is pushed using balena push <MY_FLEET> or git push to your balenaCloud devices is sent to a build server, and then, after the release is built, it is deployed to your devices.
The build server consists of a central build server and a number of Docker daemons on build workers. When a build is triggered, the builder first determines the CPU architecture of the fleet's default device type, and based on that determines what build worker will be used for the build. For ARM device types, there are build workers with armv6l, armv7l, and armv8l architectures. For amd64 based devices, native x86_64 build workers are used. Finally the armv5e and i386 architecture device types are always built using emulation.
In the case where the --emulated flag is used, the build is built on an x86_64 machine with qemu emulation to match the CPU architecture of the fleet's default device type.
If you push a project with only a Dockerfile, Dockerfile.template, or package.json file, a single container image will be built and deployed to your device. The single container will show up on the device dashboard as a service with the name main.
For multicontainer fleets (Microservices fleet types), a docker-compose.yml file at the root of the project directory will start multiple simultaneous image builds, each with their own build logs.
View Past Deployments
All successful deployments will result in a release being added to balenaCloud. These releases are tracked in their own dashboard page accessed via the fleet:
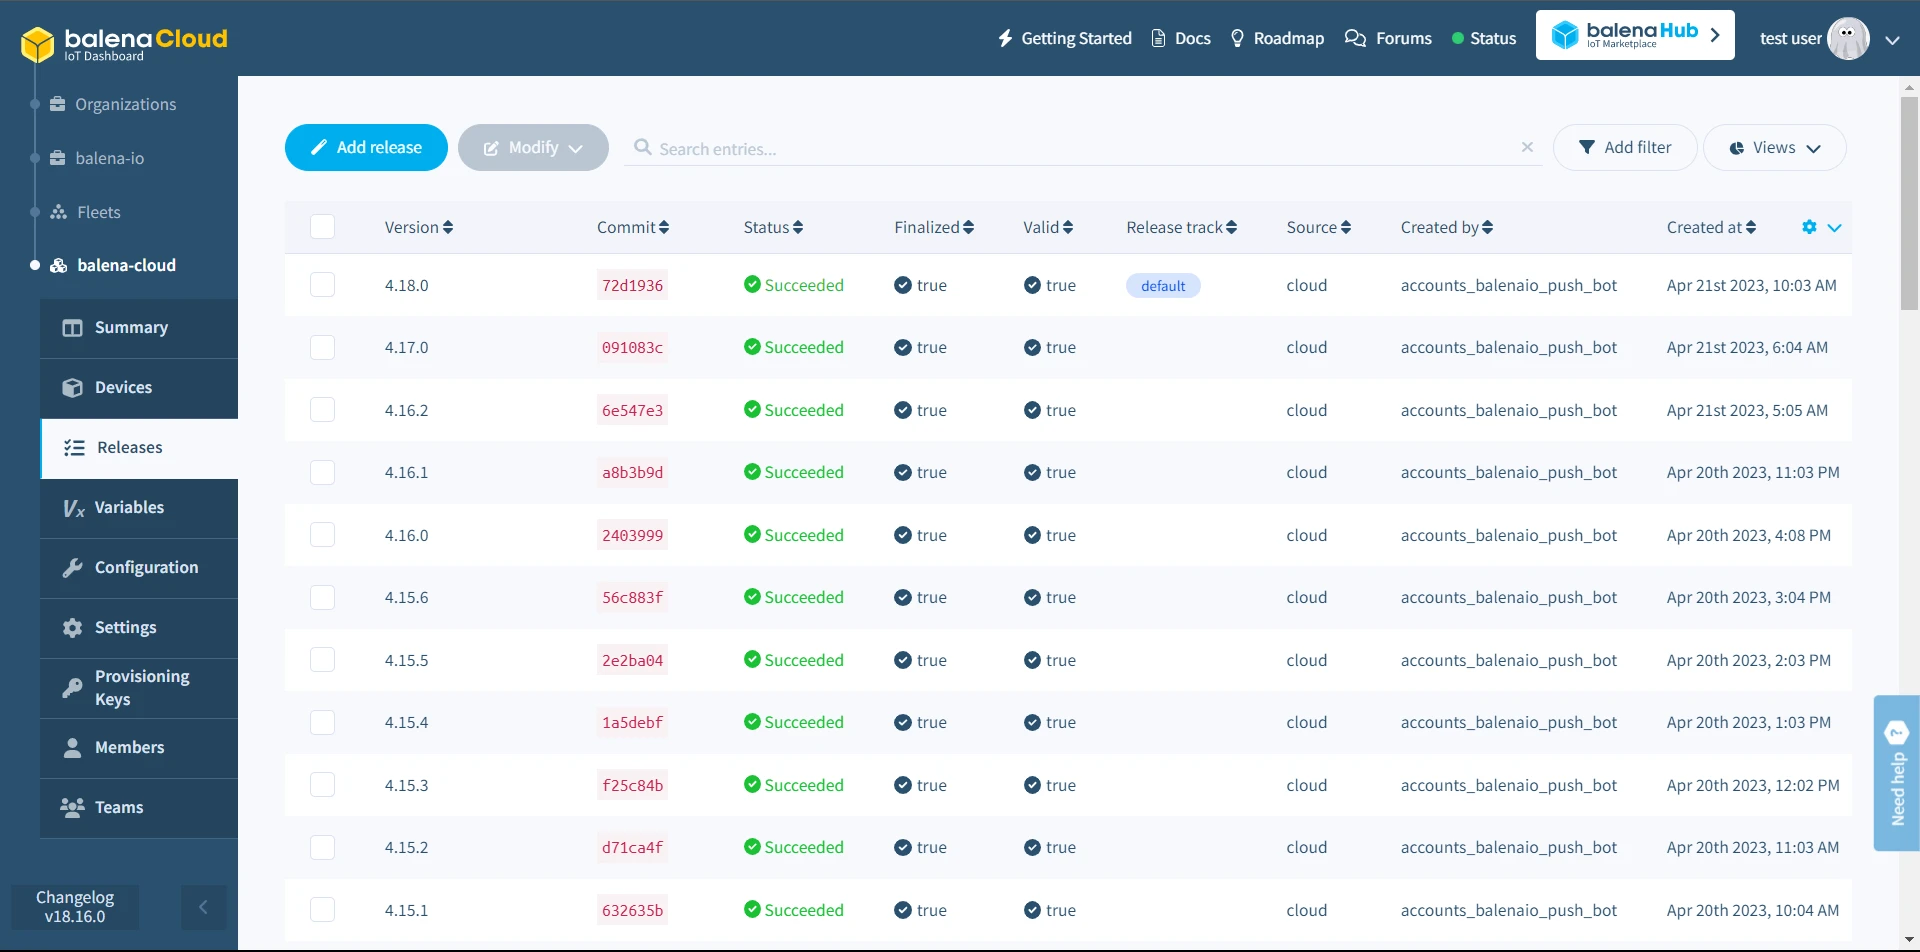
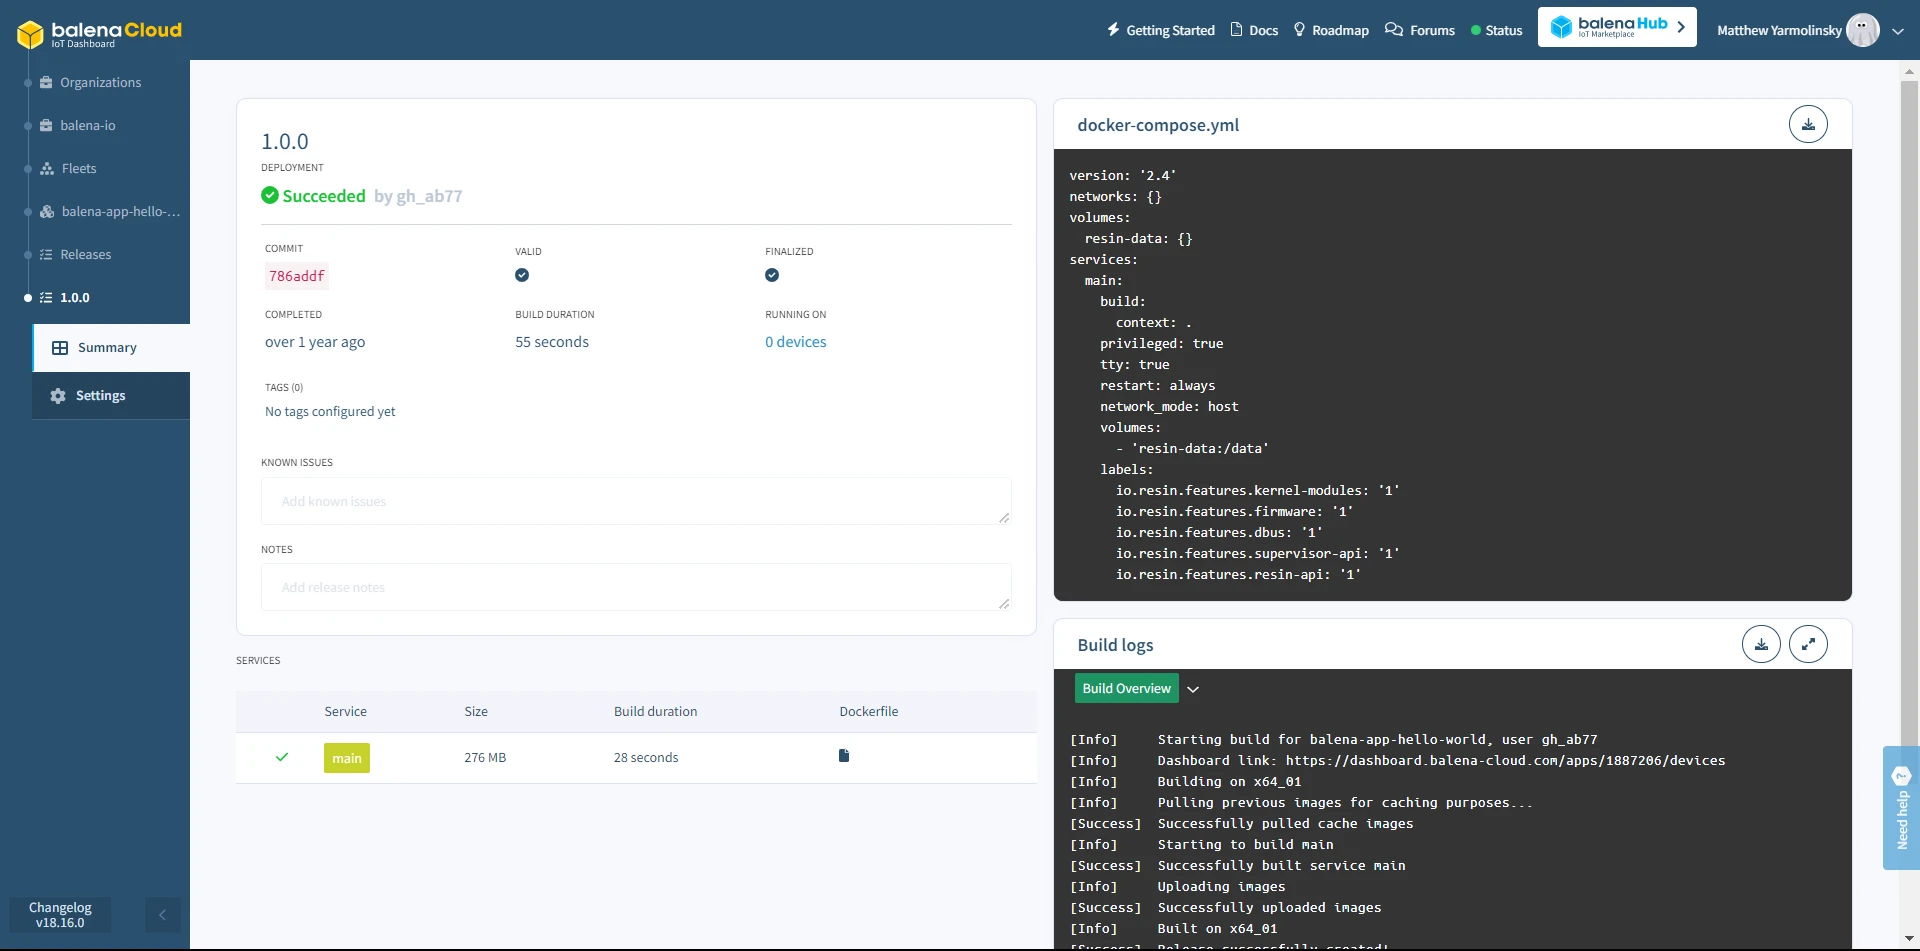
The releases page includes a list of all attempted and deployed releases, with information on the status of the release, when it was completed, how long it took, and how many devices are on that particular release. Clicking any row will open up a summary page specifically for that release, with windows showing the docker-compose.yml file and Build Logs:
Much like with the device list, filters can be added to the release list by clicking Add filter and filling in the appropriate fields:
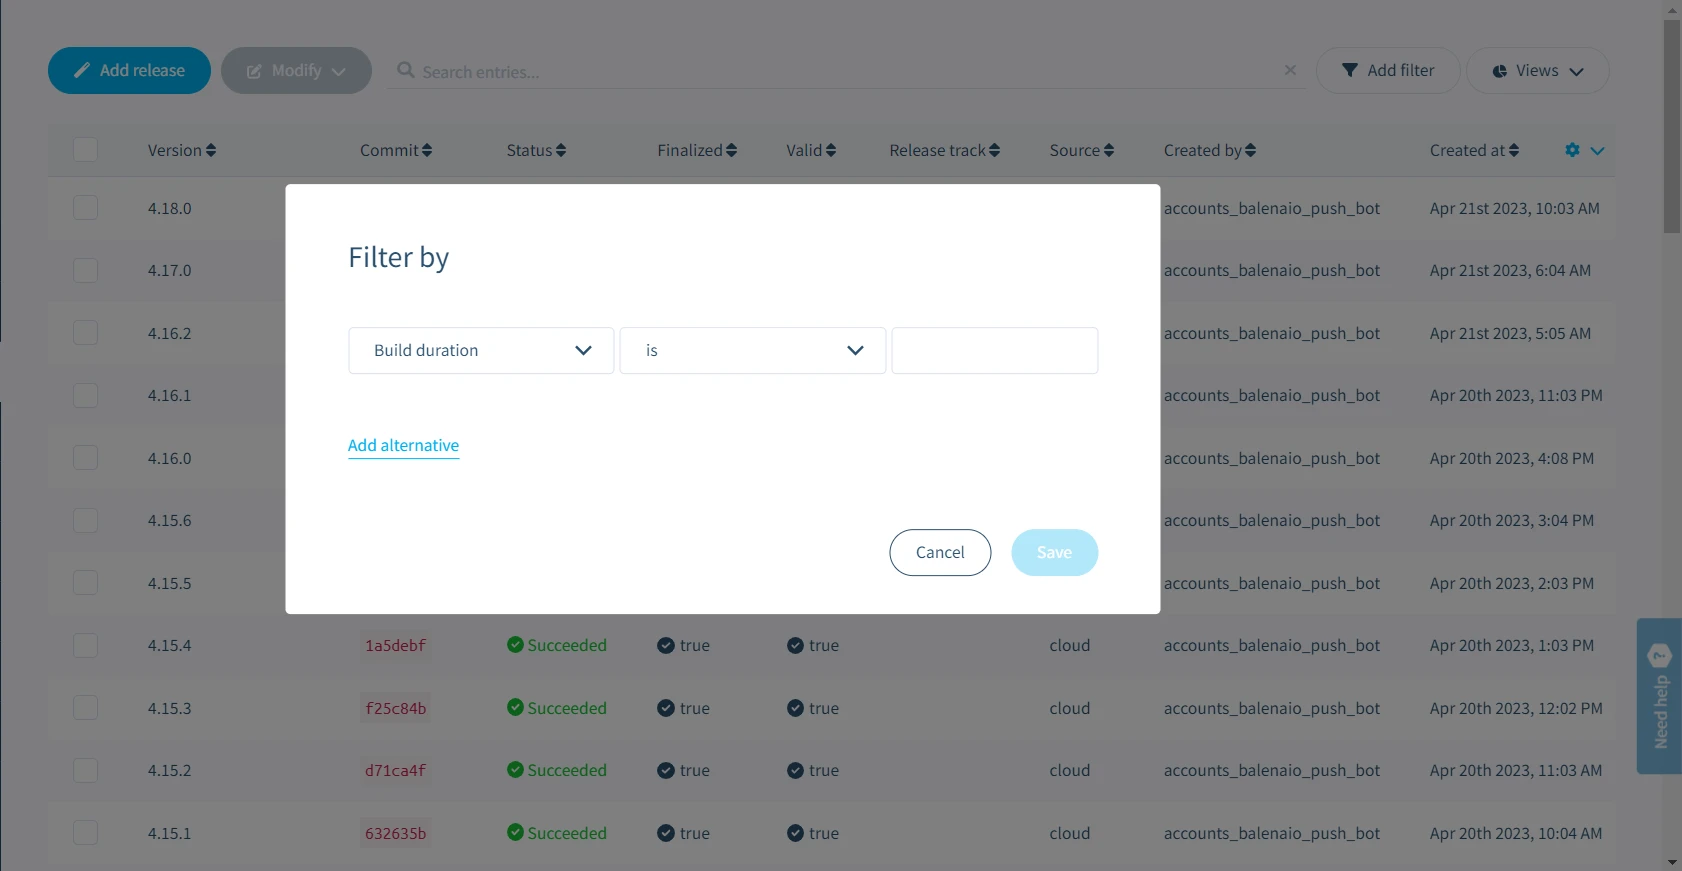
Saved views can also be created to return to a specific collection of filters.